Do you crave sweet treats that are both delicious and easy to make? Look no further! Introducing the irresistible Magic Cookie Bars with an 8×8 Pan recipe. These gooey and decadent bars are guaranteed to satisfy your sweet tooth and leave you wanting more. Whether you’re a seasoned baker or a beginner in the kitchen, this recipe is sure to impress. So grab your ingredients, preheat your oven, and get ready to experience a magical dessert that will have everyone begging for the recipe. Just be warned – one bite is never enough!

What are Magic Cookie Bars?
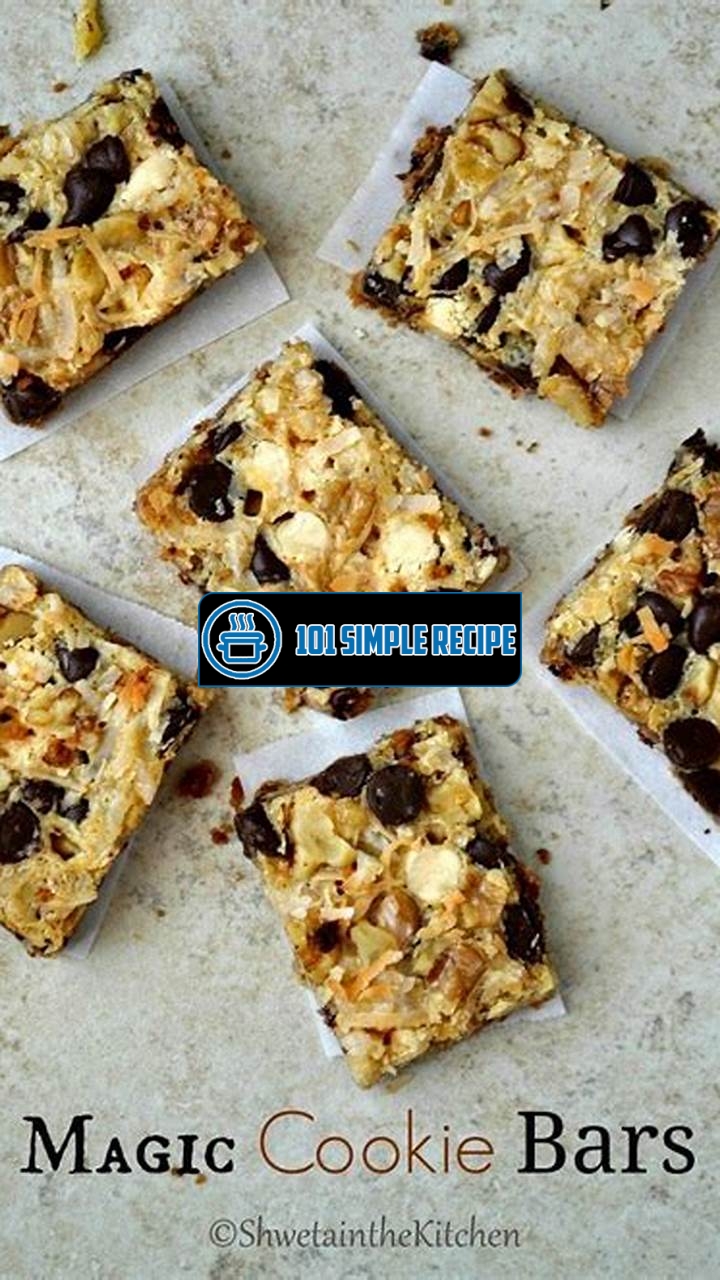
Discover the delightful world of magic cookie bars, a versatile and mouthwatering dessert that will surely satisfy your sweet tooth cravings. These decadent treats are made with layers of delectable ingredients, resulting in a harmonious combination of flavors and textures. Whether you’re a seasoned baker or a novice in the kitchen, magic cookie bars are a simple yet irresistible treat that will be loved by all.
At the heart of these bars lies the perfect balance of sweetness and crunch. Starting with a buttery graham cracker crust, each layer is carefully assembled to create a symphony of flavors. Sweetened condensed milk is then generously poured over the base, binding the other components together and adding a luscious creaminess. Finally, the top is adorned with an assortment of goodies, such as chocolate chips, chopped nuts, coconut flakes, and butterscotch morsels.
The magic happens in the oven, where the bars are baked to golden perfection. The heat melts the chocolate and caramelizes the condensed milk, creating a rich and gooey filling that oozes with every bite. The crust turns crispy, adding a delightful texture that complements the soft center. The aroma that fills your kitchen while they bake is nothing short of heavenly, making the anticipation even more unbearable.
A Brief History of Magic Cookie Bars
The origin of magic cookie bars is somewhat elusive, with no clear documentation of their creation. However, it is widely believed that these delightful treats made their debut in the mid-20th century. They quickly gained popularity due to their simplicity and crowd-pleasing nature.
The concept of layering ingredients in a baking dish and allowing them to meld together is not unique to magic cookie bars. Similar desserts, such as seven-layer bars and hello dolly bars, have been around for decades. Magic cookie bars, however, have their own special allure and charm that sets them apart from their counterparts.
Over the years, magic cookie bars have become a staple at bake sales, potlucks, and holiday gatherings. Their ease of preparation, versatility, and irresistible taste have made them a go-to dessert for many. With endless possibilities for customization, these bars can be personalized to suit any taste preference or occasion.
Key Ingredients in Magic Cookie Bars
The beauty of magic cookie bars lies in their simplicity and flexibility. While the basic recipe calls for a few key ingredients, you can easily customize them to suit your preferences. Here are the essential components of these delectable treats:
- Graham cracker crust: The foundation of magic cookie bars, the graham cracker crust lends a wonderful buttery and slightly sweet flavor.
- Sweetened condensed milk: This creamy and rich ingredient acts as the binding agent, holding all the layers together and adding a luscious texture.
- Chocolate chips: Whether you prefer milk, dark, or white chocolate, these morsels add a delightful burst of sweetness to each bite.
- Nuts: Chopped nuts, such as pecans or walnuts, contribute a satisfying crunch and nutty flavor profile.
- Coconut flakes: Adding a touch of tropical sweetness, coconut flakes are a popular addition that enhances the overall taste and texture.
- Butterscotch morsels: For those craving a hint of caramel-like goodness, butterscotch morsels are a delightful choice that adds a unique twist.
Popular Variations of Magic Cookie Bars
While the classic magic cookie bars are undeniably delicious, there are countless variations that can take this already irresistible treat to new heights. Here are a few popular variations for you to explore:
- M&M Magic Cookie Bars: Swap out the traditional chocolate chips for colorful M&M candies for a fun and vibrant twist.
- Peanut Butter Magic Cookie Bars: Incorporate a layer of creamy peanut butter to add a rich and nutty flavor that pairs perfectly with the other ingredients.
- Salted Caramel Magic Cookie Bars: Drizzle gooey caramel sauce over the top of the bars before baking to create a heavenly combination of sweet and salty.
- White Chocolate Raspberry Magic Cookie Bars: Use white chocolate chips and fresh raspberries to create a delightful fruity twist on the classic recipe.
With so many variations to choose from, you can continue to experiment and create your own unique magic cookie bar recipes that will leave everyone craving for more.
Choosing the Right Size 8×8 Pan
When it comes to baking magic cookie bars, choosing the right size 8×8 pan is crucial in ensuring consistent and delicious results. The size of the pan you use can affect the thickness of the bars and their overall baking time. Here, we will explore the importance of selecting the appropriate 8×8 pan and provide valuable insights to help you make the best choice for your baking needs.
Different Types of 8×8 Pans
Before diving into the details of selecting the right 8×8 pan, it is essential to understand the different types available in the market. Here are a few common options:
- Glass pans: Glass pans are popular due to their ability to distribute heat evenly. They also provide the added benefit of allowing you to monitor the browning of the bars from the sides and bottom, giving you more control over the final result.
- Metal pans: Metal pans, such as aluminum or stainless steel, offer durability and efficient heat conduction. They are often preferred for their lightweight nature and ease of cleaning.
- Silicone pans: Silicone pans are flexible and non-stick, making them a convenient option for removing baked goods without any hassle. They are also dishwasher safe, making cleanup a breeze.
Considerations for Pan Material
When selecting an 8×8 pan, the material plays a significant role in how the magic cookie bars turn out. Here are a few factors to consider:
- Heat conduction: Different materials conduct heat differently. Glass pans distribute heat more evenly, while metal pans may result in slightly crispier edges. Consider your preference for texture when choosing the material.
- Non-stick properties: If you prefer hassle-free baking and easy cleanup, a non-stick pan, such as silicone or those with a non-stick coating, could be the perfect choice. These pans ensure that your magic cookie bars release effortlessly without sticking to the surface.
- Durability: Consider the lifespan of the pan material. While glass pans are more prone to breaking if mishandled, metal and silicone pans are generally more durable and can withstand higher temperatures.
Features to Look for in an 8×8 Pan
Aside from the material, there are additional features you should look for when choosing an 8×8 pan for baking magic cookie bars. These features can enhance your baking experience and produce better results:
Note: Keep in mind that the availability of these features may vary depending on the brand and model.
- Size markings: Look for pans with clear size markings etched or printed on the sides. These markings ensure accurate measurements and help you follow recipes with precision.
- Handles or grips: Pans with handles or grips make it easier to remove the pan from the oven and transport it safely. They also provide a secure grip when pouring or transferring the batter.
- Lids: Some pans come with accompanying lids, allowing for convenient storage and transportation of the baked goods. These lids help to maintain the freshness of the magic cookie bars, making them ideal for occasions when you need to bring them to a potluck or party.
By understanding the importance of selecting the right size 8×8 pan, exploring the different types of pans available, considering the appropriate material, and looking for desirable features, you can bake irresistible magic cookie bars consistently. Remember, the pan you choose can have a significant impact on the final outcome, so choose wisely and enjoy the delicious results!
Looking for more tasty recipe ideas? Check out our recipe for a Coca Cola cake. It’s a classic dessert that’s perfect for any occasion.
Tips for Preparing the Pan
Discover the best techniques for preparing the 8×8 pan before baking magic cookie bars to prevent sticking and ensure easy removal.
Greasing the Pan
To ensure your magic cookie bars don’t stick to the pan, one of the most effective techniques is to grease it properly. Start by using a pastry brush or a piece of paper towel to generously apply a layer of softened butter to the bottom and sides of the pan. This will create a barrier between the pan and the cookie bars, making it easier to remove them later. Alternatively, you can use cooking spray, but make sure to coat the entire surface evenly.
Note: Greasing the pan is an essential step to prevent your magic cookie bars from sticking.
Using Parchment Paper
Another great option for preventing sticking and ensuring easy removal is to use parchment paper. Cut a piece of parchment paper that is slightly larger than the 8×8 pan. Press the parchment paper into the pan, making sure it sticks to the greased surface. Leave an overhang of parchment paper on opposite sides of the pan to act as handles for lifting the cookie bars out once they are done baking. This method not only prevents sticking but also makes for easy cleanup.
Note: Using parchment paper provides a non-stick surface and simplifies the process of removing the cookie bars from the pan.
Alternative Pan Preparation Methods
If you don’t have access to parchment paper or prefer not to use it, there are a couple of alternative methods you can try.
One option is to line the pan with aluminum foil. Make sure to press the foil into the corners and sides of the pan, leaving extra foil hanging over the edges. Grease the foil with butter or cooking spray before adding the cookie bar mixture. Once the bars are baked and cooled, you can use the foil overhang to lift them out of the pan.
Another alternative method is to use a non-stick baking spray that combines the power of grease and flour. This convenient spray can be found in most grocery stores and will provide a non-stick surface to your 8×8 pan. Simply spray a light and even coating onto the pan before adding the cookie bar mixture.
Note: In the absence of parchment paper, aluminum foil or a non-stick baking spray can be used as alternative pan preparation methods.
In conclusion, by greasing the pan properly, using parchment paper, or trying alternative pan preparation methods like aluminum foil or non-stick baking spray, you can ensure that your magic cookie bars don’t stick and are easily removable. These simple techniques will make the baking process a breeze and result in irresistible cookie bars that are sure to be a hit with friends and family.
Want to try something different? Give our peanut butter cup recipe a go. These homemade treats are sure to be a hit with friends and family.
Layering the Ingredients
Master the art of creating perfectly layered magic cookie bars in the 8×8 pan, ensuring each bite is filled with all the delicious flavors.
Order of Ingredient Layering
When it comes to creating magic cookie bars in an 8×8 pan, the order of ingredient layering is crucial to achieving a mouthwatering result. Start by lining the bottom of the pan with a layer of graham cracker crumbs. This serves as the sturdy base for the bars.
Next, sprinkle a generous amount of sweetened shredded coconut evenly over the graham cracker layer. The coconut adds a delightful tropical flavor and a chewy texture to the bars. Spread it out in an even layer to ensure every bite has a taste of coconut goodness.
Following the coconut layer, sprinkle a layer of chocolate chips over the top. The heat from baking will melt the chocolate, creating a luscious, gooey layer that is sure to satisfy any chocolate lover’s cravings. Make sure to distribute the chocolate chips evenly, so each bite has a perfect balance of cookie and chocolate.
The next layer is where you can get creative and add your favorite extras. Whether it’s chopped nuts, caramel bits, or dried fruits, this layer allows you to personalize your magic cookie bars. Sprinkle your chosen ingredients evenly so that every bite surprises your taste buds with a burst of flavor.
To finish off your magic cookie bars, drizzle a layer of sweetened condensed milk over the top. This acts as a binder, holding all the layers together and creating a rich, creamy texture. Pour the condensed milk in a zigzag pattern to ensure it covers the entire surface of the bars.
By following the proper order of ingredient layering, you can ensure that every bite of your magic cookie bars contains just the right balance of flavors. The layers create a harmonious combination of sweet, chewy, and crunchy textures that will leave you craving for more.
Techniques for Even Distribution
Even distribution of the ingredients is essential to achieving a uniform and delicious result in your magic cookie bars.
As you layer each ingredient, use a spoon or your fingers to spread them out evenly over the surface of the previous layer. This ensures that every bite has an equal amount of each ingredient and enhances the overall taste experience.
When sprinkling the ingredients, start from the edges and work your way towards the center. This technique helps prevent any gaps or clumps in the bars, ensuring that every bite is packed with flavor.
Take your time while layering the ingredients, paying attention to detail. Patience and precision are key to achieving that perfect, evenly distributed outcome.
Exploring Creative Ingredient Combinations
While the classic magic cookie bar recipe calls for graham cracker crumbs, sweetened shredded coconut, chocolate chips, nuts, and condensed milk, don’t be afraid to experiment with different ingredient combinations.
For a tropical twist, try adding crushed pineapple and macadamia nuts to your magic cookie bars. The tanginess of the pineapple complements the sweetness of the other ingredients, creating a refreshing and unique flavor profile.
If you’re a fan of peanut butter, consider substituting peanut butter chips for the chocolate chips. The creamy and nutty taste of peanut butter adds a delightful twist to the bars.
For a festive touch, incorporate holiday-themed ingredients such as crushed peppermint candies or dried cranberries. These additions not only add a pop of color but also elevate the bars with seasonal flavors.
Remember to always layer your creative ingredient combinations following the same order as the classic recipe. By doing so, you ensure that the layers hold together and maintain the signature magic cookie bar texture and taste.
So go ahead and unleash your inner pastry chef by experimenting with different ingredient combinations to create your own irresistible magic cookie bars in an 8×8 pan. Enjoy the process of mastering the art of layering and savor the deliciousness of each bite!
Baking and Serving Tips
When it comes to baking magic cookie bars in an 8×8 pan, there are a few expert tips you should know to achieve a golden brown crust and serve them for maximum enjoyment. These irresistible treats are loved by many, and with the right techniques, you can elevate their taste and presentation.
Optimal Baking Time and Temperature
To ensure your magic cookie bars turn out perfectly, it’s essential to bake them at the optimal time and temperature. Preheat your oven to 350°F (175°C) to create the perfect environment for baking these delicious treats. The moderate heat will allow the ingredients to meld together, resulting in a gooey and flavorful treat.
Pro Tip: Bake your magic cookie bars for around 25-30 minutes. Keep a close eye on them to prevent over-browning or burning. The bars should have a golden brown crust while still being slightly soft in the center.
Cooling and Cutting Magic Cookie Bars
After removing the magic cookie bars from the oven, it’s crucial to let them cool before cutting. This allows the ingredients to set and results in clean and neat slices. Allow the bars to cool in the pan for at least 1 hour before attempting to cut them.
Extra Tip: To ensure smooth and even cuts, use a sharp knife and wipe it clean between each slice. This prevents the layers from sticking together and maintains the bars’ structural integrity.
Enhancing the Presentation and Serving Suggestions
Once your magic cookie bars have cooled and are perfectly sliced, it’s time to enhance their presentation and serve them in a way that will truly impress your guests.
Serving Idea: Sprinkle a dusting of powdered sugar over the cooled bars to add a touch of elegance and enhance the visual appeal. This simple step elevates the bars from ordinary to extraordinary.
To take it a step further, serve the magic cookie bars with a scoop of vanilla ice cream or a dollop of whipped cream. The combination of warm bars and cold creamy toppings creates a delightful flavor and texture contrast.
To make the serving experience even more special, consider adding a variety of toppings such as chocolate drizzle, caramel sauce, or crushed nuts. These additions not only add visual interest but also provide different layers of flavor.
Fun Fact: Magic cookie bars are incredibly versatile and can be customized to suit different tastes and preferences. Try adding ingredients like shredded coconut, toasted nuts, or even mini marshmallows to create your own unique twist on this classic treat!
By following these expert baking tips and serving suggestions, you’ll be able to create irresistible magic cookie bars in an 8×8 pan that will leave everyone craving for more. So, get your apron on, gather the ingredients, and start baking some magic!
If you’re looking for a delicious dessert that’s easy to make, try these magic cookie bars. They’re made in an 8×8 pan and are sure to satisfy your sweet tooth.
Thank you for taking the time to read our article about magic cookie bars made in an 8×8 pan. We hope you found the information helpful and inspiring for your next baking adventure.
If you’re craving more delicious recipes and baking tips, be sure to visit our website again in the future. We update our content regularly to provide you with fresh and exciting ideas for your kitchen.
Remember, baking is all about experimentation and creativity, so don’t be afraid to put your own twist on these magic cookie bars. Whether you’re a seasoned baker or just starting out, these bars are sure to impress your friends and family. Happy baking!
Frequently Asked Questions
Here are some common questions about magic cookie bars:
| No. | Questions | Answers |
|---|---|---|
| 1. | What size pan should I use to make magic cookie bars? | The recipe is designed for an 8×8 pan, but you can adjust the measurements if you prefer a different size. |
| 2. | Can I substitute any ingredients in the recipe? | Feel free to get creative with the ingredients! You can try different types of chocolate chips, nuts, or even add some dried fruit. |
| 3. | How long do magic cookie bars stay fresh? | If stored in an airtight container, magic cookie bars can stay fresh for up to a week. |
| 4. | Can I freeze magic cookie bars? | Yes, you can freeze magic cookie bars. Just make sure to wrap them tightly in plastic wrap or place them in a freezer-safe container. |
| 5. | What variations can I try with these bars? | You can try adding different types of candies, like M&M’s or Reese’s Pieces, for a fun twist on the classic recipe. |
| 6. | Can I use a different type of graham cracker crust? | Absolutely! You can use any type of cookie or cracker crust that you prefer. |
Jump to Recipe
Magic Cookie Bars 8×8 Pan

Delicious and easy-to-make magic cookie bars using an 8×8 pan. Perfect for any occasion!
- 1 ½ cups crushed graham crackers
- ½ cup melted butter
- 1 cup chocolate chips
- 1 cup butterscotch chips
- 1 cup shredded coconut
- 1 cup chopped nuts
- 1 14 oz can sweetened condensed milk
- Preheat your oven to 350°F (175°C).
- In a bowl, combine the crushed graham crackers and melted butter. Press the mixture into the bottom of an 8×8 inch baking pan.
- Sprinkle the chocolate chips, butterscotch chips, shredded coconut, and chopped nuts evenly over the crust. Pour the sweetened condensed milk evenly over the top.
- Bake in the preheated oven for 25 minutes, or until golden brown and bubbly. Allow to cool before cutting into bars.


